66-67 Dodge Charger Source Guide
Headlights
Rotating |
| Rotating headlights are a major source of fun for 66-67
Charger owners. If you want to fix your own have at 'er. There is a lot of info on this and linked pages. Look to the right and see work by Don and Allen or scroll down on this page If you want to get yours fixed by an expert let Topher do them: |
Don Dodson |
Allen Stephenson |

Wiring Diagram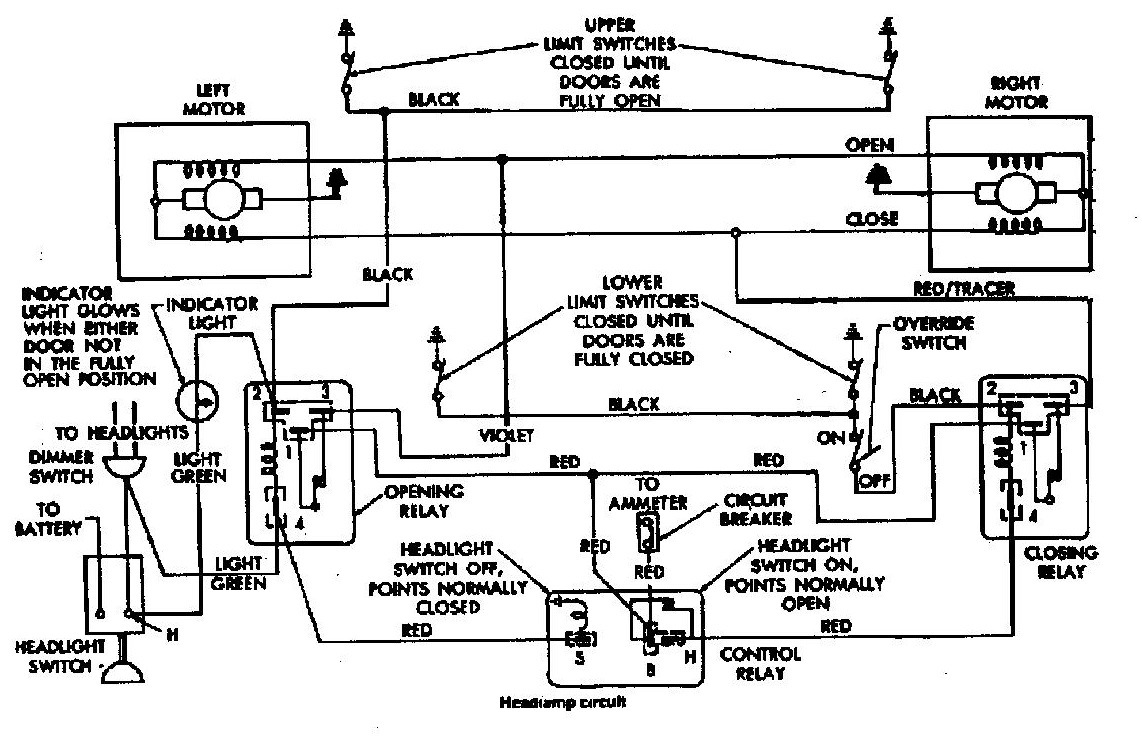 |
How to Test the MotorsPosted by Daniel Daigneault on 06/08/03You have 3 connectors on the motors, 2 are parallel (side by
side) and a 3rd
@ 90 degrees.
The 90 degrees is the ground so connect the ground from the battery to
it. |
| Posted by Don Dodson on
03/16/04
I have found that the weakest part of the motors is the connection on the circuit board of the heat thermal. Over time the connections will get hot along with the thermal and the connections will become corroded and offer resistance to the current flow through the loose connector. I drilled out the terminal and installed a screw and nut, along with lock washers that make the terminals have a better connection. Also I have found that the motors operate better when the car is running and using the 14.7 volts put out by the alternator instead of the 12 volts of the battery. |
How the Motor WorksPosted by "Charger66" on 03/08/05The motors work on a harmonic drive principal. The 3 round metal discs press against the plastic "toothed" piece and engage the "toothed" metal housing at the point of contact. It takes one revolution of the 3 discs to move the "toothed" plastic piece one tooth on the housing. A harmonic drive have several good thiings going for them for these motors. One is a big gear reduction (ie electric armature spins very fast yet output is a much slower rotation) , second there is no gear backlash and once power is removed from the motor the output shaft will not move by external force. 66-67charger.com Tech Archives "Rotating" article: Rotating Headlight Engine |
How to Disassemble the MotorsPosted by John Mac on 03/06/05First take apart the motor carefully!!!! Where the two halves of the motor are joined is some sealant -clean it out - you will see a " c " type of clip - use a small flat screwdriver to get it out - open the motor - the side with the shaft is what you want to get cleaned and lubed up!!!!. Sometimes the shaft will get dry or the rubber washer will expand and cause the shaft to bind when it turns. If you clean and lube the shaft/rubber washer and put it back together and it still binds ( bench run the motor with a battery ) then open it up again and take out the washer from within the housing and carefully use some 120 sandpaper and remove a bit of the inside rubber that is running on the shaft. (This was my problem with 3 motors I rebuilt - gotta be a problem up here with the heat/cold temps!!! Posted by Topher on 03/16/04 There's a snap ring that is buried in some sealer in the groove you see-I dug the stuff out with a small screw driver and removed the snap ring. When you get all that out-the 2 halves will come apart, the "shaft end" can be disassembled easily and you'll find a disc that covers the brush plated, a 3 weight disc that is the drive for the geared cup, a spring loaded disc that keeps tension on the shaft, a big cup that has way small teeth on the outside of it and a recessed place for the shaft to sit. When you get all this stuff out of this end you'll see that the shaft goes through an o-ring in the hole. I cleaned all of this up and put some emery cloth to the shaft to clean it up, oiled it up and it worked freely with my fingers. That's the mechanical end. The motor side is a different story. You have to un-solder the brush plate to remove it, after you remove the 2 screws. Draw yourself a diagram or take a good picture before taking it apart, because there's several wires to remove. After you get the brush plate out of the way you can remove the stator, then work on removing the windings. The power wires come up each side of the windings in sheaths, so it may be a little difficult to remove the windings, but they will come out past the wires. Now that you have the windings in front of you, you should take note that there is 2 different size wire used between the 2 sides. I think this is where the speed difference comes from. Because one side is stronger than the other, and since there is only 1 motor to install on both sides you're using opposite windings going in the same direction, or you're using a weak side and a strong at the same time in both directions which explains the speed variance. |
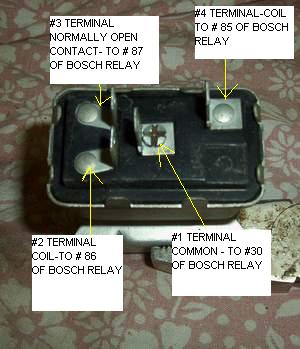
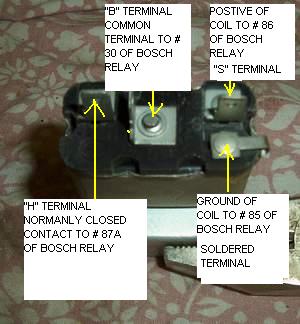
Headlamp Relays and Switches
(with additional information submitted by John Kane) |