66-67 Dodge Charger Source Guide
Glass
Vent Windows |
Windshield |
Rear Window |
Q & A |
Side Windows
Maintenance KitYou will need to replace all of the plastic bits you find in this. R/T Specialties has most of what you need but is usually more expensive and not as complete a kit."Fuzzies" or Window WiskersSubmitted by: Paul Q on 02/07/06The easiest way to replace the rear quarter fuzzies is to remove the inner door panels, and remove the lower window stops. Then, the window will drop down far enough to let you change the fuzzies out. Submitted by : Aarin on 02/05/06 If you want original type appearing windowfelts or
catwhiskers, DO NOT buy the parts manufactured by PUI. They do not have
the flocked wiper on the outer, merely using the same material as the
inner, which is a poor copy of the correct type. The original inner is
a very dense "bristle" effect, with a squared off look (like a flat-top
brush cut). This PUI junk is a softer, less dense material with a
rounded off cross-section. I looked at a vendor (Deutschman Automotive) at a swap meet last week. He had a no-name package which contained the spitting image of the PUI stuff which I have no use for. I am about to order from John
P, as he assures me that his are of the correct profile. Submitted by: Greg Rose on 02/09/06 Lengendary Auto Interiors |
Window RegulatorsSubmitted by: Bob Christiano on 04/08/07Front not the same Rear The Coronet is not the same as Charger. Regulator stem is shorter on Coronet because of the thinner door panel. |
Power Window SwitchesFrom Collectors Auto Supply - posted by: XP29H72 on 11/12/05
|
||||||||||||||||||
Switch Maintenance and Trouble Shooting
Posted by: Bryan (A383Wing) on 04/06/06
|
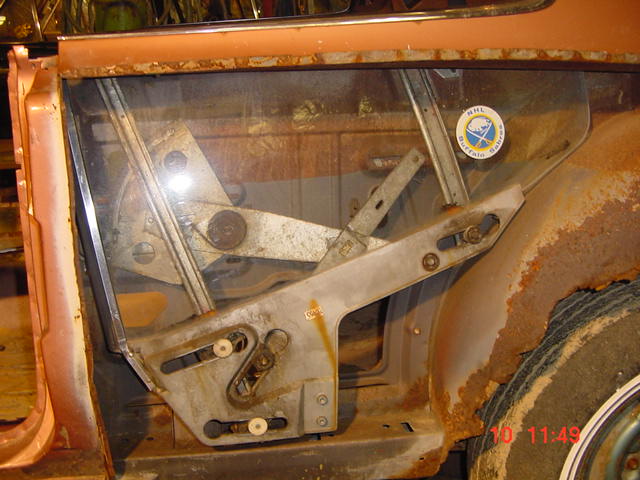
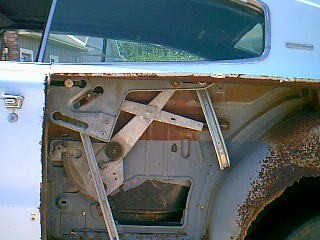
Glass ReplacementPosted by: Al on 06/26/03The 1966 charger rear quarter tempered glass is 30"x16" with a slight curve. a large window bottom channel is bonded to the bottom of the glass and the glass front edge is bonded to a metal weatherstrip. In everyday use the window drops a little and then pivots in the rear to continue down and back along the front travel guide. Swivel type rollers are used on the front and rear travel guides. Removing BOTH travel guides makes repairs easier. The front travel guide uses 2 roller assemblies.
the 2 rollers are removable and fit slots in the
window bottom channel. The rear travel guide uses a
single roller which comes out of its slot when the
travel guide is removed. All rollers are swiveled to
ease adjustment in the travel guides. Disconnect 2 regulator arms. Front arm has roller assembley that sits in a slotted hole in bottom window channel. Rear arm sits in a hole in bottom window channel held by snap ring. Jockey glass around till you can reach into rear access hole and pry snap ring off pin freeing rear regulator arm. To free front regulator arm, pry snap ring off holding roller and pull roller off regulator arm. To remove rear travel guide-remove top nut and bottom screw-pull guide down a little, twist to release swivel roller from bottom window channel. To remove front travel guide-remove upper and lower nut-tilt glass till rear of glass is tilting down--pull front travel guide down to free it from top roller-pull down more till guides slides off bottom roller. Carefully take guide out. slide roller assemblies out through enlarged holes of their slotted holes. Now remove glass-tilt glass inward-lift up and out. To install window. hold assembly (glass and bottom window channel) in rolled up position with bottom channel just inside belt line (belt line area is about where your arm would rest) tilt glass to the rear, put 2 front travel rollers in their slots in bottom window channel. Prop or hold glass, EASE in front travel guide, GENTLY push guide up and EASE it on to bottom front travel roller. Slowly push guide up til it slides onto top front travel roller. Once front travel guide is engaged with its rollers level/straighten glass and while holding up install guide bolt and screw. LIGHTLY tighten front guide. While holding glass up EASE rear travel guide in. position guide so that swivel roller engages slot in bottom window channel. Now replace and LIGHTLY install rear guide. Install and hold front regulator roller in its slot while the front regulator arm is EASED in. secure front regulator arm with snap ring. Install rear regulator arm using snap ring. Check window travel (will glass roll up/down?). install front/rear top travel stops. adjust travel guides and stops for correct travel and contact with roof and front door glass. Tighten travel guide bolts and screws. Reinstall trim. |
![]()